Getting Started
The fastest path from download to shooting.
1. Download the Ethereal Loader
Grab our loader from ethereal.pub/loader. It installs everything Ethereal on your PC.
Search for "Ethereal" in your emails to find your license key. It's sent automatically after purchase.
Don't run the loader yet! Install Ethereal Guard in step 2 first, so Windows Defender doesn't delete it the moment you double-click it.
2. Install Ethereal Guard
Windows Defender often flags or deletes cheat loaders. Ethereal Guard is a tiny utility that tells Defender to leave Ethereal's files alone. This only affects Ethereal, the rest of your PC stays fully protected.
Download Ethereal Guard (small utility, ~550 KB)
How to use it
- Double-click
EtherealGuard.exefrom your Downloads folder. - Click Yes on the Windows admin (UAC) prompt.
- Click the big purple "Shield Ethereal" button.
- Wait for the green checkmark. You'll see "Ethereal Protected", then you can close the window.
Run Ethereal Guard once and you're set forever. You don't need to run it every time. The exclusions stay until you or Windows explicitly removes them.
3. Run the Ethereal Loader
Now that Defender is set up correctly, run the loader you downloaded in step 1. Sign in with your license key and launch your product from inside the loader.
Always run the loader BEFORE opening your game. The cheat needs to attach as the game starts, and the loader is what makes that happen.
Troubleshooting
The loader won't download
Cause: Your firewall is blocking the download.
Fix (Windows Defender Firewall):
- Press
Win + Ito open Settings. - Go to Privacy & security → Windows Security.
- Click Firewall & network protection.
- Click each active network profile (Domain / Private / Public) and turn Microsoft Defender Firewall off.
- Download the loader again.
- Turn the firewall back on when the download is done.
Third-party firewall (Norton, McAfee, ESET, etc.): temporarily disable it from its own tray icon, download the loader, then re-enable it.
Ethereal Guard won't run or gets deleted
Cause: Your antivirus is quarantining Ethereal Guard before it can add its own exclusion.
Fix (Windows Defender):
- Open Windows Security (Start menu → search for "Windows Security").
- Click Virus & threat protection → Manage settings.
- Turn Real-time protection OFF (this is temporary).
- Run
EtherealGuard.exeand click Shield Ethereal. - Turn Real-time protection back ON. The exclusion sticks.
Fix (third-party antivirus like Norton, Kaspersky, Bitdefender, McAfee, ESET, Malwarebytes Premium):
Third-party antivirus programs replace Windows Defender, so Ethereal Guard can't manage their exclusions directly. Do this instead:
- Temporarily disable your antivirus from its own tray icon (right-click the icon in the bottom-right of your taskbar).
- Run Ethereal Guard, click "Shield Ethereal", then close it.
- Add the following to your antivirus's exclusion list manually (check its settings under "Exclusions" or "Whitelist"):
C:\ProgramData\ethereal%AppData%\Ethereal%LocalAppData%\Ethereal- The Ethereal loader itself. This is the
setup_*.exeyou downloaded from ethereal.pub/loader (the filename has random characters, e.g.setup_lZf272X8wf0.exe). Either add the exact file, or exclude the folder you saved it in (usually Downloads).
Re-enable your antivirus when you're done.
Still stuck? Message us on the support chat on ethereal.pub (bottom-right of the page) and we'll walk you through it.
Aimbot
The most advanced aimbot powered by A.I.
Enemies MUST be highlighted RED for AI detection to work correctly
Aimbot Settings
- Aimbot Keybind: Activation key to turn on the aimbot
Recommended key:RMBorLMB(Right or Left Mouse button) - Aim Speed: Controls how fast the aimbot moves to the target
Recommended values:10-20 - Confidence: How confident the AI has to be to aim onto the target. For example,
if you set 50% confidence and the AI is 80% confident it's a target, then it will aim at
them
Recommended values:60-75 - Aimbone: Where to aimbot on the target
Recommended value:Neck - Humanization: Makes your aimbot look more legit
Recommended value:Smooth - FOV: The range where the AI will aimbot onto the target
Recommended value:80-140
Advanced Aimbot Settings
- AI FOV: The maximum resolution the AI can see on the screen
Recommended value: Always use320x320unless you are experiencing low AI FPS - AI Filtering: Filters out small or large objects that cannot be enemies
Recommended:Normal - AI FPS Cap: Set a cap on how fast the AI can perform
Recommended:144-165 - Only on Use: Only activates the AI when you are holding down an aimbot keybind
to save performance
Recommended:ON - AI Mode: You will get more AI FPS on Performance mode at the cost of worse
detection
Recommended: If you are achieving at least200 AI FPS, use Accuracy mode. If not, Performance mode is still fine to use
Everyone has different in-game settings which will affect the aimbot. These are only recommended settings. For example, if your aimbot speed is too fast or too slow, then adjust it accordingly
Use LMB (left mouse button) if you want to look ultra-legit on spectate cam. You will almost never be called out using LMB, so it's highly recommended
Triggerbot
Automatic firing when your crosshair is on target.
How It Works
The triggerbot automatically fires when an enemy is detected in your crosshair, providing instant reactions that are humanly impossible.
Triggerbot Settings
- Fire Until Release: Fires until you release your triggerbot keybind. If the AI
loses detection on the target and you still need to shoot, then this can be useful
Recommended setting:ON - Keybind: The keybind to activate the triggerbot
Recommended:RMBor a side mouse button - Randomized Delay: Randomly delays the triggerbot to reduce player suspicion or
anti-cheat automated detections
Recommended:Normal (50-150ms) - Fire Bone: Where the triggerbot will fire at the target
Recommended:Full Body - Confidence: How confident the AI has to be to fire on the target. For example,
if you set 50% confidence and the AI is 80% confident it's a target, then it will fire at
them
Recommended value:75-85%
Our triggerbot works directly with our RCS system. When the triggerbot activates, it will also use the anti-recoil on your weapon so it perfectly fires at them
Performance Optimization
Maximize FPS and minimize input lag for the best gaming experience.
Optimizing R6 Pro
R6 Pro is designed to be lightweight, but you can further optimize performance to maximize AI FPS.
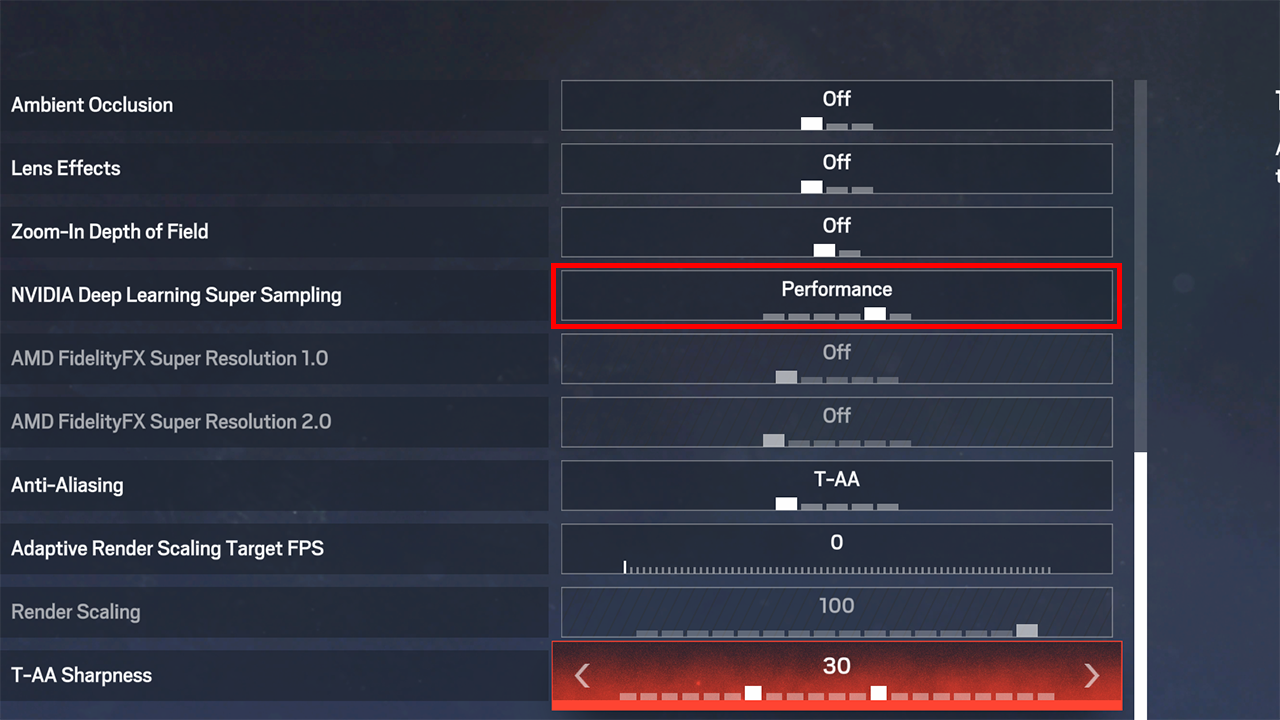
Game Graphics Settings
- Put ALL graphics on lowest apart from LOD Quality and Shadow Quality
- If you have the option for NVIDIA Deep Learning Super Sampling (DLSS), put it on
Performancemode - If you don't have DLSS, put render scaling below
60
Game FPS
Capping your game FPS is extremely important to free up performance space for the AI.
You have TWO options:
- (Best!) Open NVIDIA Control Panel → click "Change Resolution", change refresh
rate to either
120/144/165. Now go into your game display settings and enable "VSync" - Go into your game's display settings and simply put the FPS Limit to
120OR144OR165
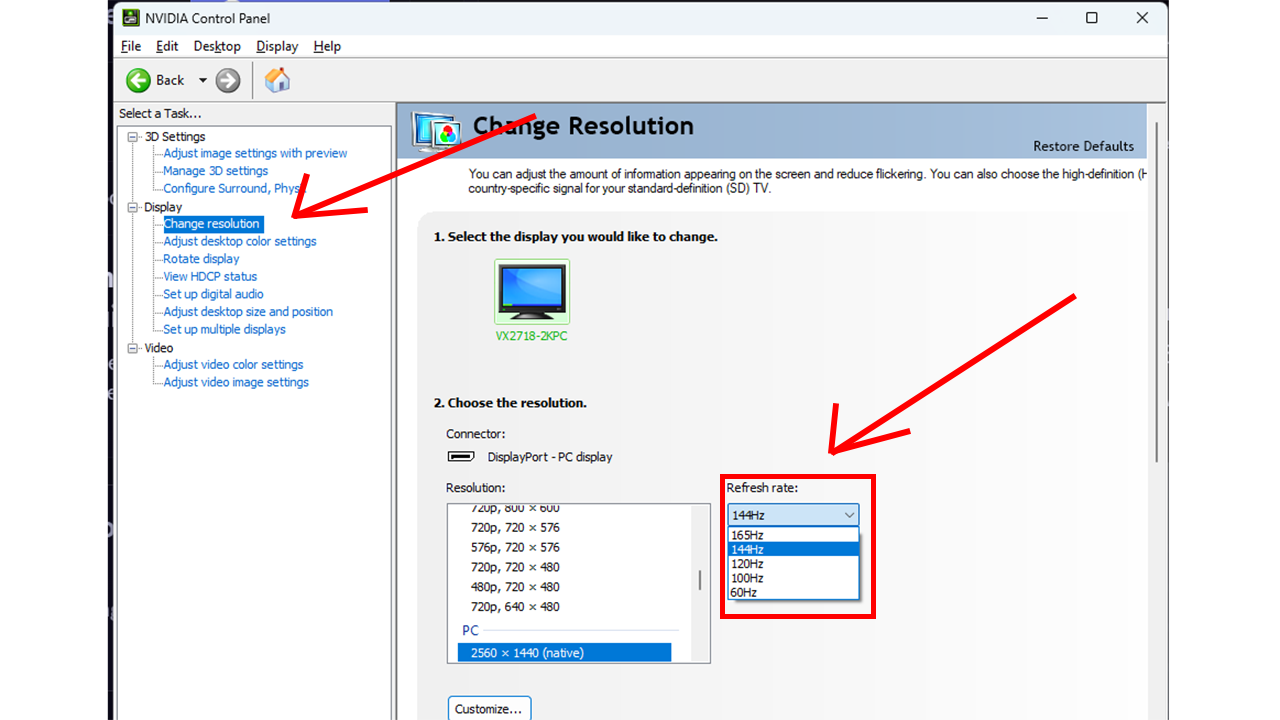
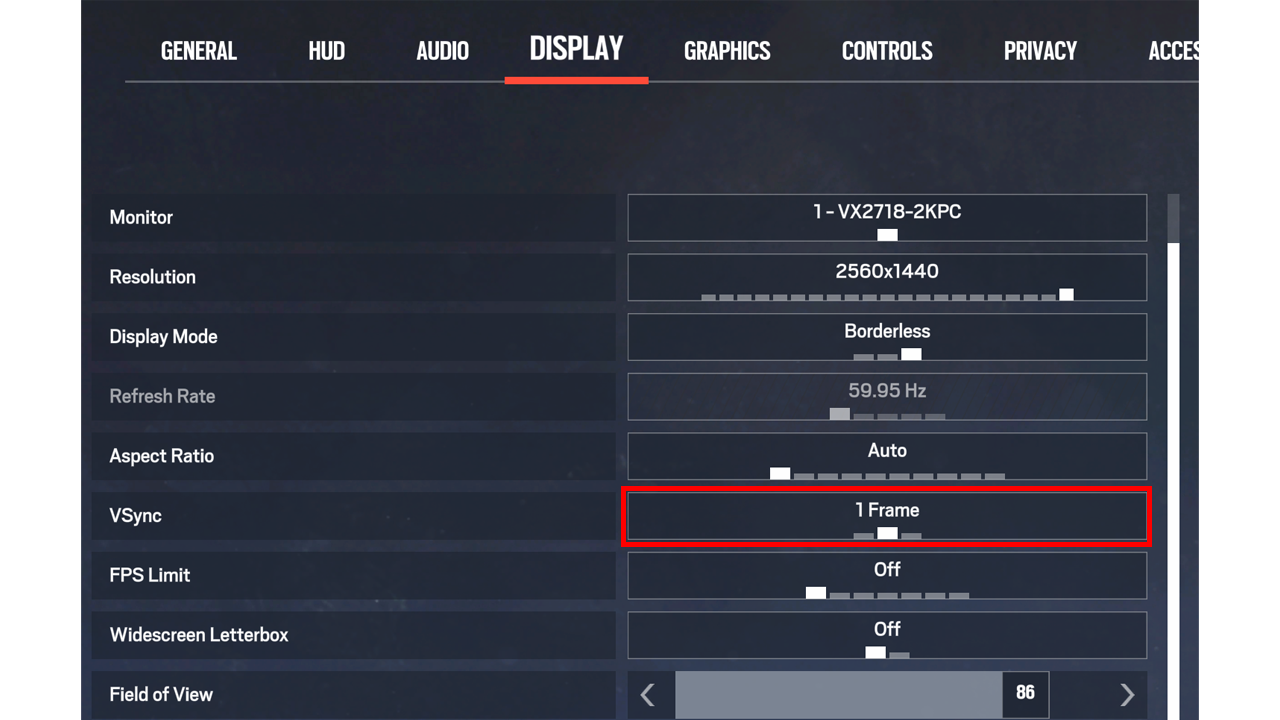
You want to try to achieve at least 200 AI FPS for a smooth aimbot experience
Game Settings
- Enemies MUST be highlighted red for AI detection to work correctly
- Put your crosshair opacity "Optic Opacity" to
20so the AI has better vision
Both these settings can be found in Rainbow Six Siege settings under the Accessibility tab.
Windows Settings (Optional)
- Type "Game mode" in your taskbar, and disable Game Mode
- If you want to go even further, you can disable "Hardware-accelerated GPU Scheduling" in graphics settings, though this isn't fully recommended if your game isn't getting enough FPS
The 320x320 model provides the best balance between performance and accuracy
GPU Optimization
For NVIDIA users:
- Enable "Prefer Maximum Performance" in NVIDIA Control Panel
- Disable V-Sync in game settings
- Use "Low Latency Mode" in NVIDIA Control Panel
- Ensure drivers are up to date
For AMD users:
- Enable "Anti-Lag" in AMD Software
- Set "Radeon Boost" to maximum
- Disable "Enhanced Sync"
- Ensure drivers are up to date
Troubleshooting
Common issues and their solutions.
Common Issues
Software Won't Start
Problem: R6 Pro doesn't launch or crashes immediately.
Solution:
- Ensure your antivirus is turned off
- Exclude your loader in your anti-virus settings
- Install Visual C++ Redistributables
- Turn VPN ON/OFF or restart your PC and try again
Aimbot Not Working
Problem: Aimbot doesn't lock onto targets.
Solution:
- Your game must be in borderless
- Ensure the AI is loaded (AI FPS will move when in-game)
- Ensure enemies are highlighted red
- Check FOV isn't set too low
Low FPS / Performance Issues
Problem: Game runs slowly or lags when using R6 Pro.
Solution:
- Switch to a lighter model (
320x160) - Lower the capture resolution
- Close background applications
- Update your GPU drivers
- Check the Performance Optimization section
Connection Issues
Problem: Cannot connect to authentication server.
Solution:
- Disable your firewall temporarily
- Check your internet connection
- Whitelist the application in Windows Firewall
- Try using a VPN
If none of these solutions work, please contact support on our Discord server
Weapon Detection
Automatic weapon detection for the ultimate convenience.
How It Works
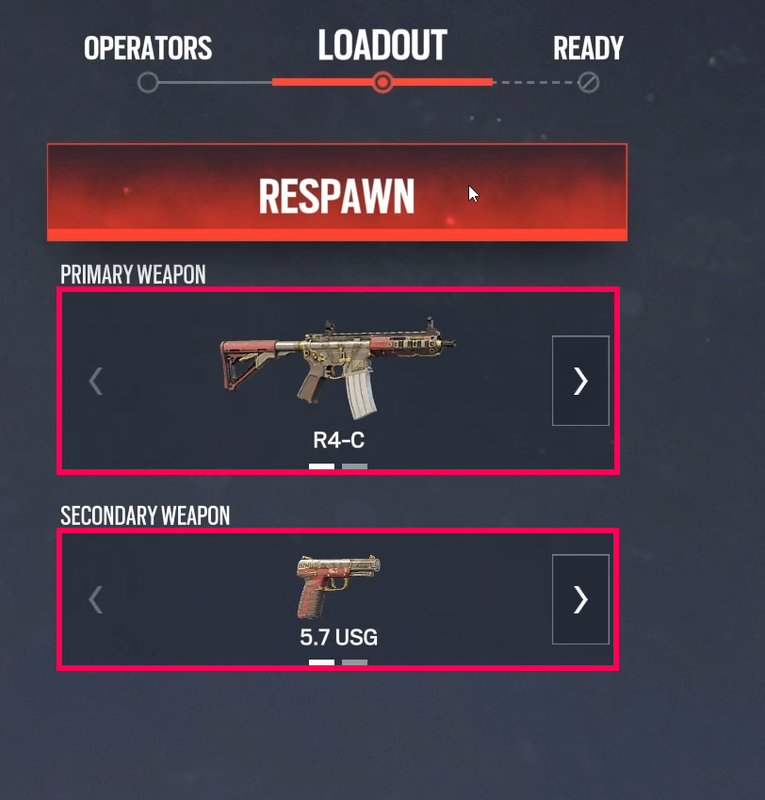
Weapon detection should be automatically calibrated for you, but if it's not perfect, you can press the "Setup detection areas" button, go to loadout where you can see both your primary and secondary, then click "Auto calibrate".
The weapon detection will only work when you are on the "Loadout" screen on your operator, where you can see your primary and secondary gun (see screenshot)
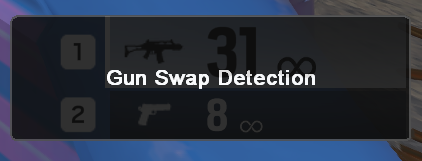
Gun-swap Detection
Automatic detection between primary and secondary weapons.
How It Works
Uses advanced optimized pixel detection to detect when you change your guns and automatically change recoil patterns or turn rapid fire on/off.
If it's not detecting your primary or secondary swap, then go into Setup detection zones and place the boxes over your guns in the bottom right (see screenshot).
If you change your HUD settings, then you will need to re-do the detection areas
Anti-recoil
Automatically controls your weapon's recoil.
Gun-swap detection must be ON for anti-recoil to work
Attachments
Ensure your attachments are the same in-game and on the menu. For example, if you detect R4-C with weapon detection which has 2.5x scope, compensator, and vertical grip, on the menu it will look like this:
2.5xSightsCompensatorBarrelsVerticalGrips
Attachments will auto-save on each gun. You don't need to manually save them
Adjusting the Recoil
Enable auto-calculation, and all your guns should control well. If they don't, follow the next steps:
- Disable auto-calculation
- Adjust the
1.0xrecoil amount slider on 1.0x scope until it feels good - Do the same for
2.5xscope and you're done
Auto-calculation works good for 99% of people. If it doesn't for you, your game sensitivity may be too high. Ensure it's below 30 horizontal / vertical, then just increase your mouse DPI.
Advanced Recoil Settings
This feature will allow you to fine-tune your weapons if the normal recoil doesn't control them well enough on some guns. Only use this feature if you know exactly what you're doing.
- Go to the Advanced tab and turn on "Advanced recoil settings"
- If you now go back to the Recoil tab, you will see an X and Y slider appear under your guns
- For X slider: X means left and right. If your gun is pulling too far right, then you will put the X slider more left
- For Y slider: Y means up and down. If your gun is pulling too much down, then you will put the value lower (less strength). If your gun isn't pulling down enough, then you will put the value higher (more strength)
Recoil control will never be absolutely perfect, but advanced recoil settings help fine-tune the weapons you want to
OneDrive
Fix Ethereal reading old sensitivity / FOV settings on PCs where OneDrive is backing up your Documents folder.
The Problem
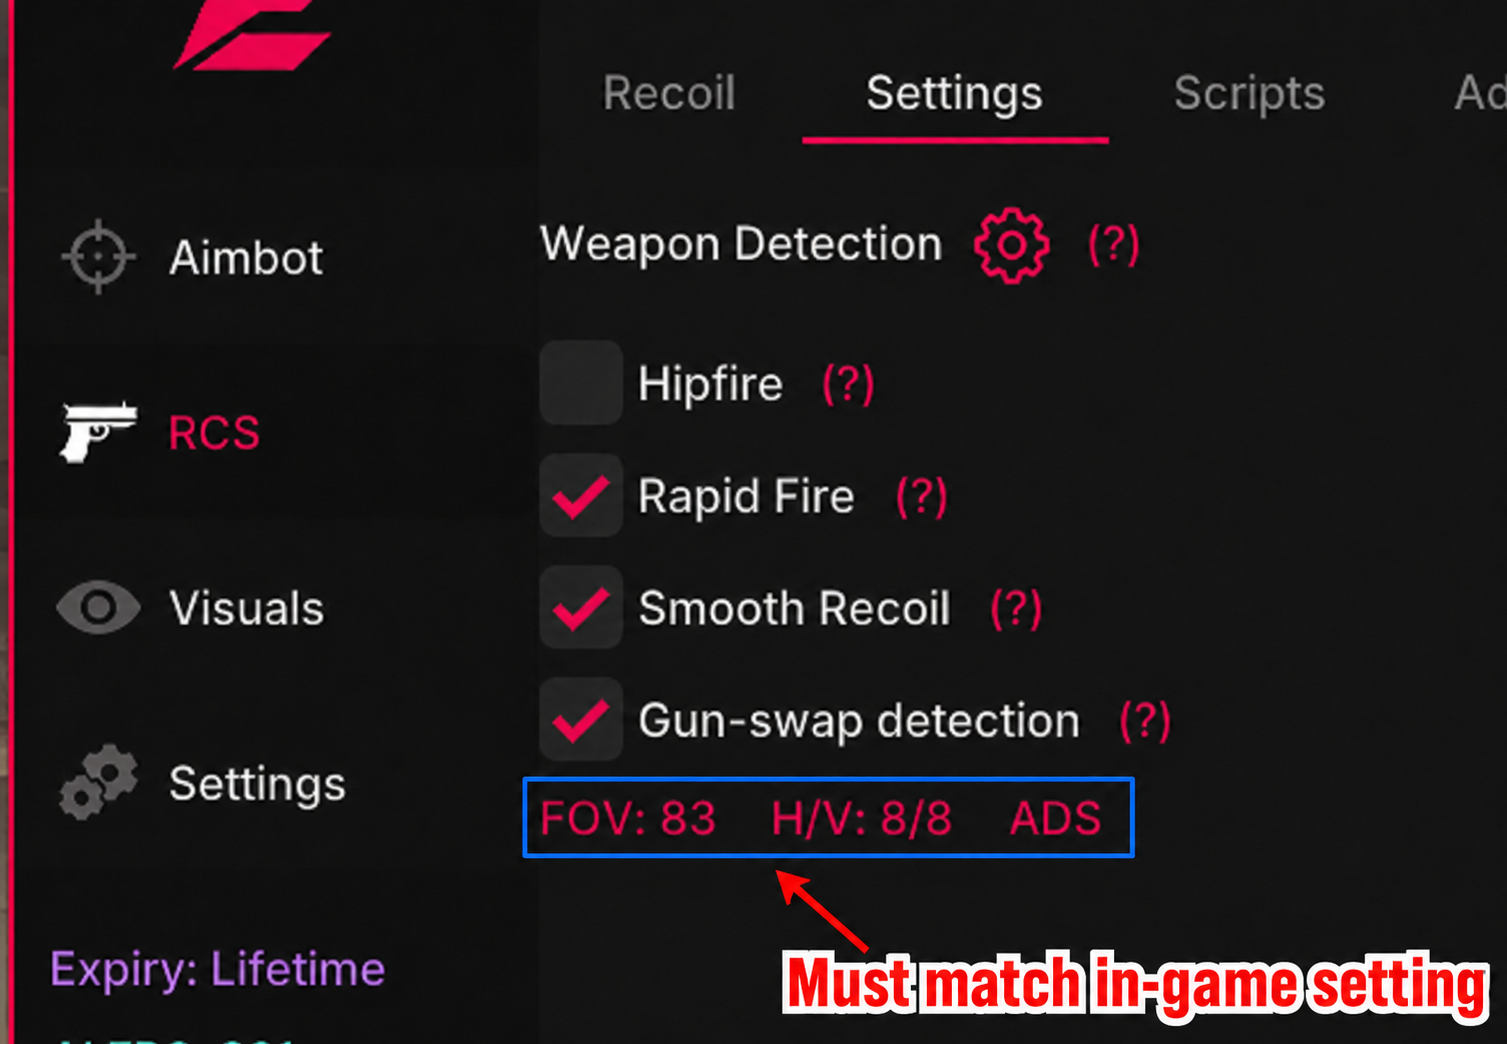
If the FOV, H/V, or ADS readout at the bottom of the Ethereal RCS menu doesn't match what you actually have set in Rainbow Six, your recoil will feel off, even if friends with the same in-game settings are perfectly fine.
The Cause
Windows OneDrive is backing up your Documents folder. Rainbow Six saves your sensitivity and FOV in Documents, and when OneDrive is backing that folder up, R6 can no longer save changes to this PC properly, so Ethereal ends up reading old settings and calculates recoil for the wrong values.
On a PC without OneDrive Documents backup this never happens. If your recoil is fine and the menu values already match your game, ignore this page.
The Fix
Turn off OneDrive's Documents backup. Takes about a minute.
Step 1. Open OneDrive's folder-backup settings
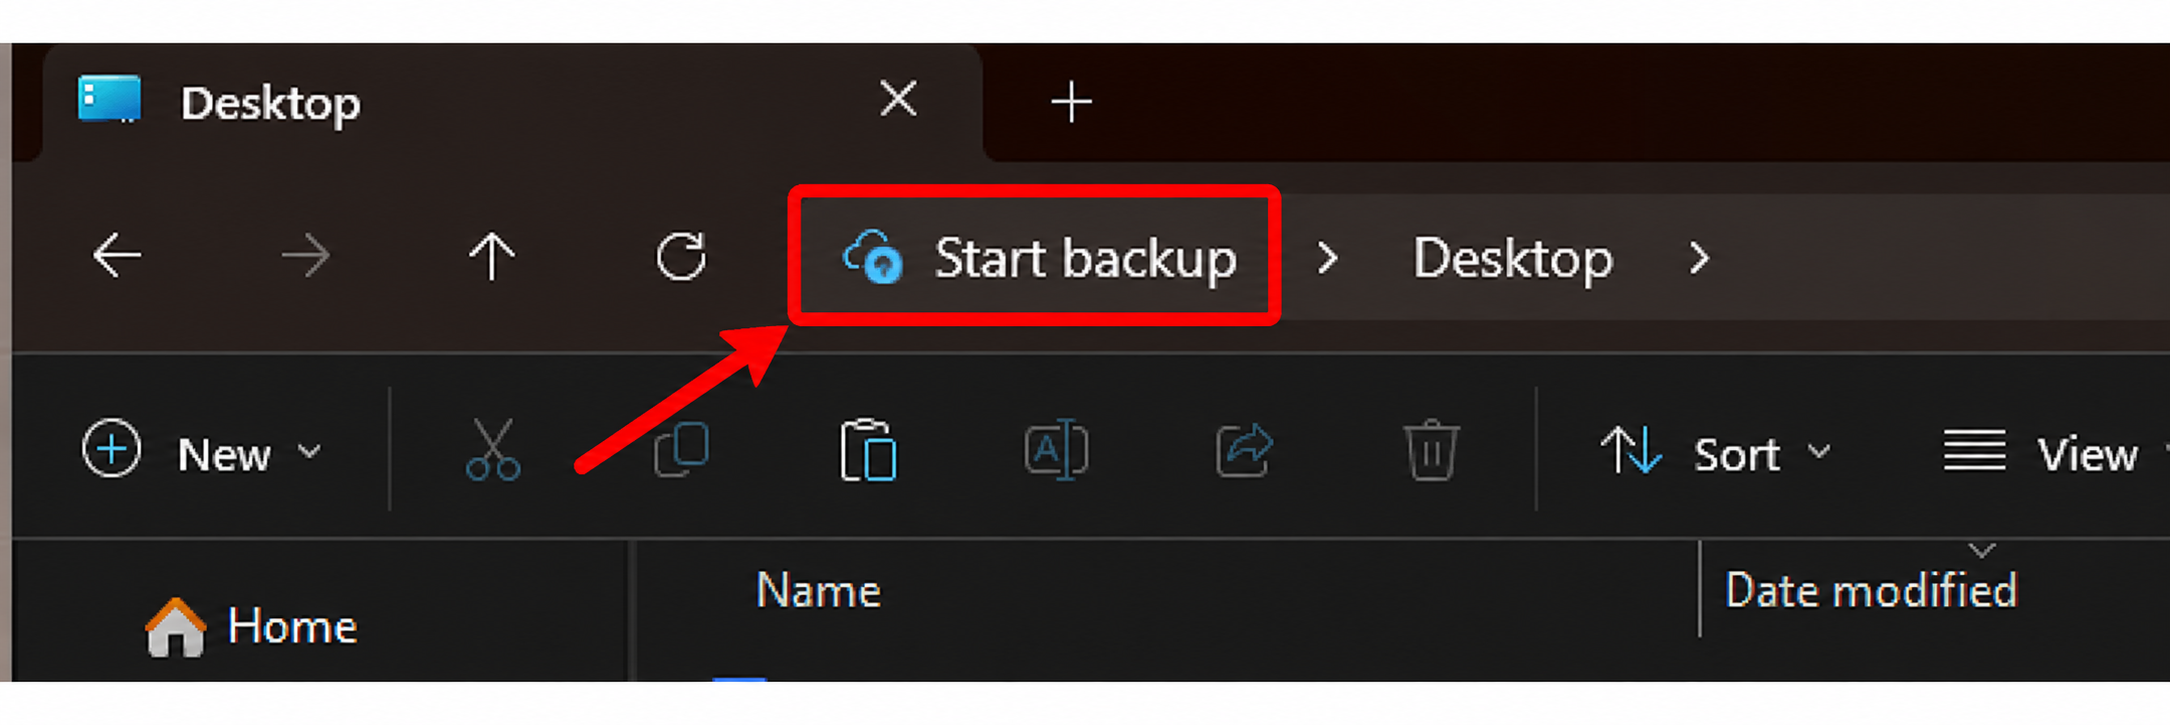
Open File Explorer and click the Start backup cloud button at the top of the window. Alternatively, click the OneDrive cloud icon in your taskbar → Settings ⚙ → Sync and backup → Manage backup.
Step 2. Turn OFF the Documents toggle
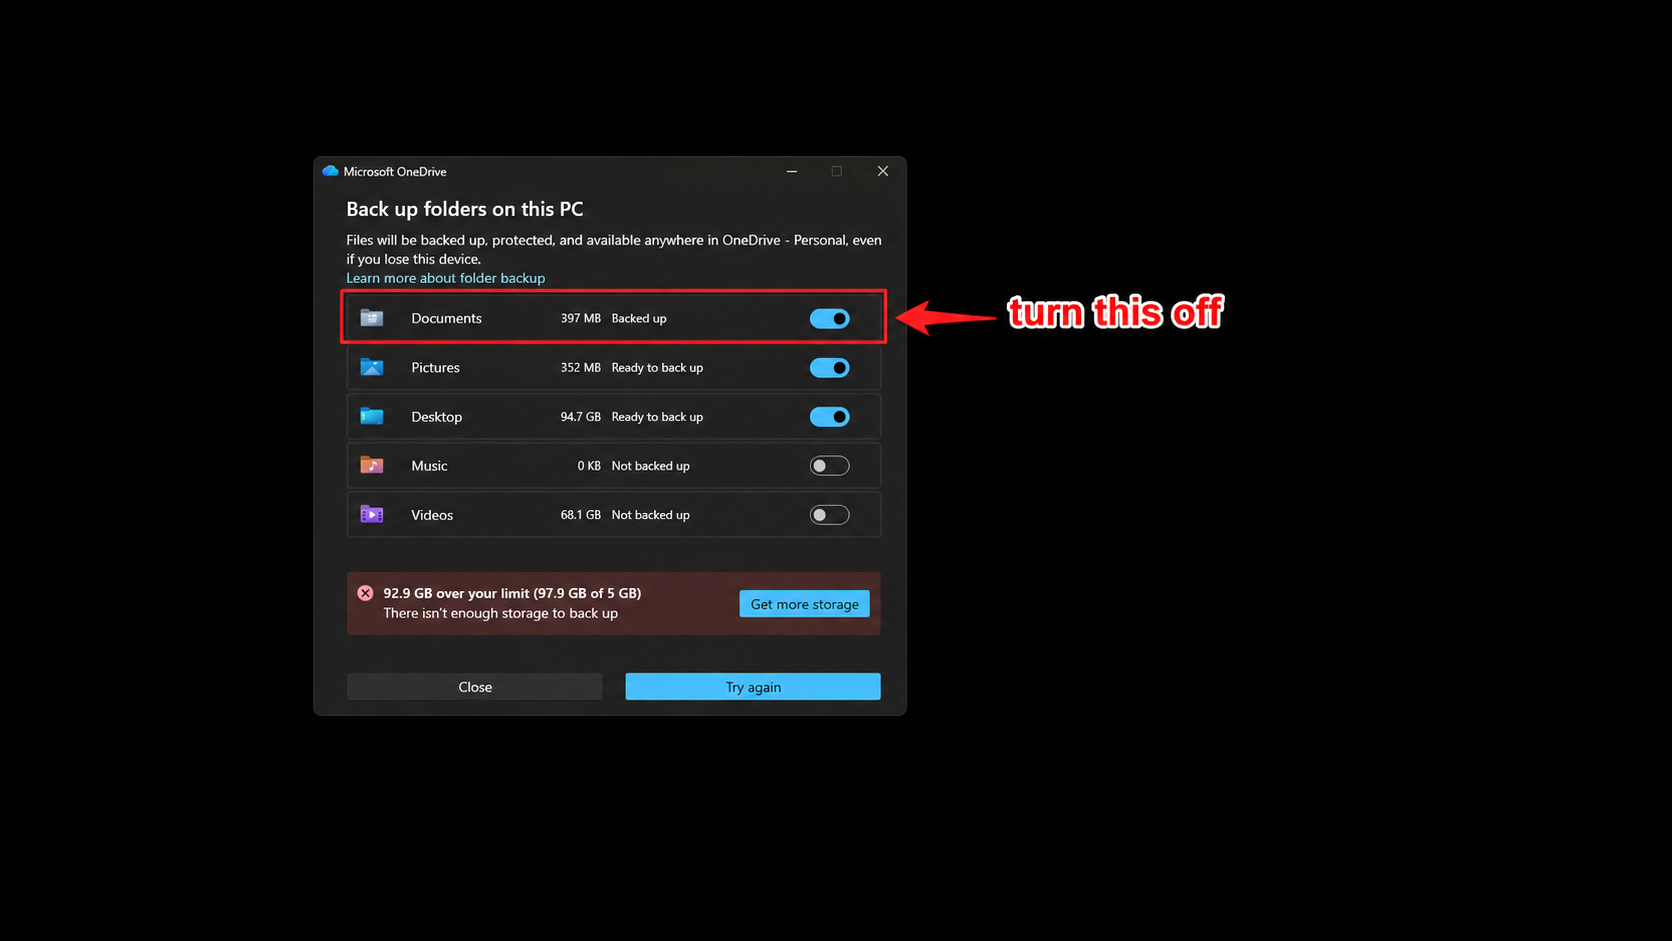
In the "Back up folders on this PC" window, turn OFF the toggle for Documents.
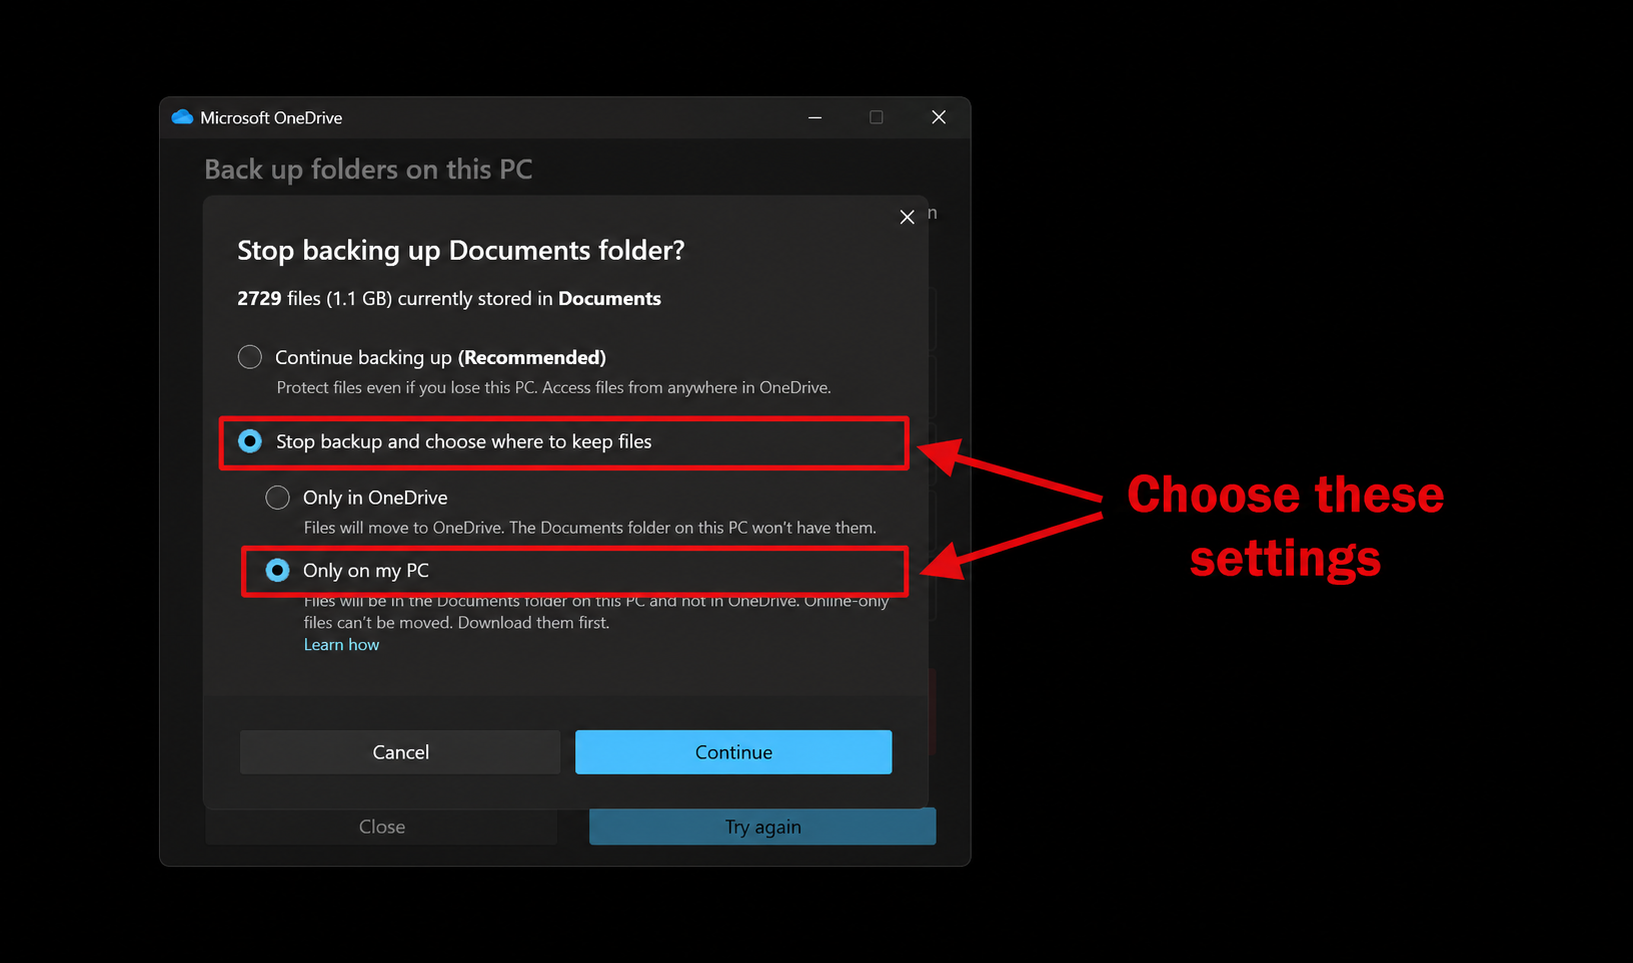
Step 3. Keep your files on your PC
In the confirmation popup, choose Stop backup and choose where to keep files, then select Only on my PC, and click Continue.
Step 4. Restart Rainbow Six
Restart Rainbow Six Siege. The FOV / H-V / ADS readout in the Ethereal menu will now match your in-game settings and your recoil will auto-calculate correctly.
This only affects the Documents folder. Your other files (Pictures, Desktop, etc.) stay backed up if they were already, and your existing Documents files are kept on your PC.
RCS Troubleshooting
Common issues with the Recoil Script and their solutions.
Common Issues
Recoil isn't being controlled at all and my selected guns aren't being detected
Solution:
- Turn on "Gun-swap detection"
- Without gun-swap detection, the recoil system will NOT work
The recoil isn't controlling my weapon correctly
Solution:
- Ensure the attachments on your menu are the same ones you are using in-game
- Enable auto-calculation for best results
- If your sensitivity is above 30, lower it and increase your mouse DPI instead
For additional help, join our Discord server and create a support ticket
Video Guide
Full Setup Tutorial
Video guide is outdated. But it can still help.
Join our Discord server for additional video guides and community showcases